You are here: Building the Model: Advanced Elements > Material Handling Systems > Conveyors > Modeling Conveyors
While not essential, it is visually more effective to draw conveyors to scale on the layout. You should also size entities traveling on a conveyor to scale when you create them. Setting the length of a conveyor different from the scale length or conveying entities that have a length or width that is not to scale will result in the appearance of load overlapping or excessive load spacing. The underlying logic and simulation is still valid, regardless of whether the graphics are to scale.
Loads may appear to jump when transferring from the end of one conveyor to another conveyor. This is a result of ProModel not allowing a load to transfer onto a conveyor until there is room for the load. Including a transfer time in the Move Logic column of the Routing edit table can result in smooth movement between conveyor sections. Defining a variable called Transfer_Time and using that variable rather than entering the actual time allows for experimentation with various conveyor speeds with minimal modeling changes.
Clock precision is also important. Note that movement of one foot at 40 feet per minute will take .025 minutes. If clock precision is set at .1 minutes, truncation will result in zero time. Make sure you check your model for the correct clock precision. For most conveyors, a clock precision of .001 is adequate. ProModel may require greater precision for high-speed conveyors where speeds are greater than 200 fpm.
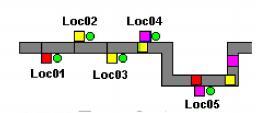
Modeling conveyors in ProModel is quite easy. Select the conveyor icon in the Locations Graphics window and place the beginning and ending points of the conveyor using the mouse. Clicking the right mouse button will end the conveyor. Left-click to add or delete a joint and allow the conveyor to bend.
Some users prefer to display the grid and select the Snap to Grid option in the View menu. Others will leave Snap to Grid off. You may find that the precise positioning of a conveyor is easier when you turn Snap to Grid off and set the Zoom sufficiently high. When you need to change the type of conveyor to accumulating, double-click on the conveyor icon in the layout, select the Conveyor Options button, and select Accumulating from the Conveyor Options dialog.
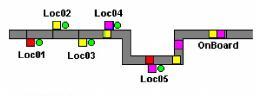
The following six examples show various ways of modeling conveyors:
Example A Routes one or more parts from one or more non-conveyor locations to any conveyor location.
Example B Routes one or more parts from any conveyor location to one or more non-conveyor locations.
Example C Routes single parts from any conveyor location to one or more other conveyor locations.

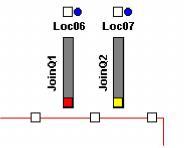
Example D Joins one or more parts from one or more non-conveyor locations to another transporting entity (e.g., a pallet or carrier) at any conveyor location.
Example E Accumulates multiple parts coming from one or more non-conveyor locations onto a conveyor location.
Example F Splits parts at a conveyor location sending one or more parts to a non-conveyor location and a single part (e.g., a pallet or carrier) onto the conveyor.
